Showing posts with label Color balance. Show all posts
Showing posts with label Color balance. Show all posts
Friday, May 18, 2012

Thursday, January 12, 2012
Using a Color Checker and Lightroom's Tonal Adjustment Tool to Ensure Proper Exposure
Here are a few simple steps that will help produce perfectly exposed images using the Munsell Color Checker and Adobe Lightroom.
In Lightroom's Develop screen, you will see the image Histogram and, while this image looks pretty good to start, the exposure is just a little low.

Use the color picker and click on one of the neutral squares in the color chart to get a good color balance.


In Lightroom's Develop screen, you will see the image Histogram and, while this image looks pretty good to start, the exposure is just a little low.

Click image to enlarge
Use the color picker and click on one of the neutral squares in the color chart to get a good color balance.

Use the Exposure slider to bring the value of the white square to read about 96.5% - the image will look very bright at this point.

96.5 is the CIE Lab values for white square on the Color Checker.

Using the Tone Curve, set the curve to Linear and limit the highlights to 90%

Click on the Tonal Adjustment Tool and move the cursor over one of the next neutral squares on the color checker. Here it reads about 77% RGB - the actual Lab value for this square is 66.7.

Click on the square with the Tonal Adjustment Tool and drag the cursor down until the value reads 66.7.

Usually, once the middle values about right, all the others pretty much fall into place. You can spend a lot of time tweeking the curve to try to get the values perfect, but I find that a nice organic curve without too many adjustments makes the most pleasing reproduction.
I am looking forward to Adobe Lightroom 4, which is currently in Beta. It looks like it will have even better tonal controls.
Monday, May 23, 2011
METRO - Intro Photoshop Class
Thank you to everyone who attended the Intro Photoshop and Digital Imaging workshop. Here are links to the presentation in .pdf form and the sample images we used in class. The presentation is all fuzzy when viewed in Google Docs, so make sure to download it to see it clearly.
Metro Intro Photoshop Class
Workshop images
Workshop images
Here is a link to the NARA Technical Guidelines for Digitizing Archival Materials for Electronic Access that I reference in the presentation. It is an excellent source of information for digitization projects.
Thank you to everyone at the Metropolitan New York Library Council.
Friday, April 29, 2011
Lightroom How-to: Batch Color Balance Using Munsell Color Checker
One of the great things about Adobe Lightroom is the ability to batch color balance photos. We include a Munsell (Macbeth) Color Checker in every shot. Here's how I color balance using the eyedropper tool.

Open a representative image
Our photographers shoot hundreds of pictures in a day. The camera settings and lighting is always the same which makes color balancing batches of images easy. The color checker is always in the same location.
Zoom in to 100% magnification (press the 1:1 over the navigation)

Select the eyedropper tool

Position the eyedropper and click
You'll want to find a neutral tone. For some reason I find the second lightest square to work best for me. Make sure you are only selecting the grey area. And click. That's it! It's color balanced.

Return the color picker
I kind of wish that once you make a selection by clicking that the eyedropper tool would return to it's original place. It doesn't. Make sure to put it back. If you don't navigation can get a little confusing.
To batch process, select all the pictures (CTRL A) and use the SYNC command.

Select-all thumbnails (they'll be highlighted when selected)

Sync brings up the synchronize menu - I sync all the global adjustments

Confirm
Once the adjustments are synchronized, you'll see the little +/- symbol in the corner of the thumbnails. This means the picture was edited.

Double check
It's a good idea to double check some of the images - just to make sure they look okay.
Wednesday, April 13, 2011
Copy-Stand Photography
The traditional repro-photography set up is usually a camera mounted on a copy stand with two lights set at 45 degree angles to the shooting surface. Usually the simplest solutions work the best.
Here is our newly refurbished copy-stand at The New York Botanical Garden Herbarium:

When I started at the Herbarium, this is what it looked like this:

This set-up was once used for specialized purposes. The lights were bare bulbs and there was a white plastic diffusion tent with top had removed and strings holding the side walls up - of course, this meant that the lights could not be moved. Unfortunately, the light was not very even. You can see where people had tried to cut the light by taping pieces of paper and neutral density filters to the diffusion tent.
We now have two stations like the one shown up top. By standardizing our two shooting stations, any special training or operator skills have been eliminated - leaving the photographers to focus their attention on the subject matter. The f-stop, shutter speed, and color balance is the same for both stations, which means that the photographer can just come in and start shooting at either station. The standardized results from the two shooting stations means that image processing and quality control goes much faster. The need to re-shoot specimens for quality reasons has been all but eliminated and productivity is up over 25%.
Here is our newly refurbished copy-stand at The New York Botanical Garden Herbarium:

The camera is a Canon Eos 1ds Mark II, the lights are Speedotron Black Line strobes with Chimera soft-boxes to diffuse the light and eliminate any shadows. Since this photo was taken, the camera has been replaced with a Canon Eos 1ds Mark III producing 21 megapixel shots.This set-up is a significant upgrade over its predecessor.
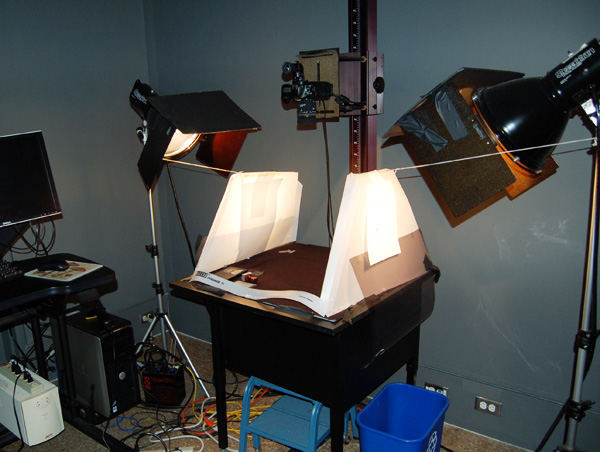
This set-up was once used for specialized purposes. The lights were bare bulbs and there was a white plastic diffusion tent with top had removed and strings holding the side walls up - of course, this meant that the lights could not be moved. Unfortunately, the light was not very even. You can see where people had tried to cut the light by taping pieces of paper and neutral density filters to the diffusion tent.
We now have two stations like the one shown up top. By standardizing our two shooting stations, any special training or operator skills have been eliminated - leaving the photographers to focus their attention on the subject matter. The f-stop, shutter speed, and color balance is the same for both stations, which means that the photographer can just come in and start shooting at either station. The standardized results from the two shooting stations means that image processing and quality control goes much faster. The need to re-shoot specimens for quality reasons has been all but eliminated and productivity is up over 25%.
Subscribe to:
Posts (Atom)